


If you’re planning to replace your back boiler, one of the biggest unknowns is what actually happens during the process. For many homeowners, the concern isn’t just the cost—it’s the disruption, the mess, and what their home will look like afterwards.
The good news is that while back boiler removal is more involved than a standard boiler swap, it’s a well-established process. With the right installer, it’s straightforward, controlled, and typically completed within one to two days.
If you’re still weighing up whether it’s worth it, you may want to read our guide on back boiler vs modern boiler cost differences or find out whether you can still buy back boilers in the UK. But if you’re ready to understand what the process actually looks like, here’s exactly what happens.
Step 1: Home survey and system assessment
Everything starts with a survey. An engineer will visit your home to assess your current back boiler system, your pipework, and your heating and hot water needs.
This stage is about more than just choosing a new boiler. It’s where decisions are made about the type of system (combi or system boiler), the best location for installation, and any additional work required.
You’ll also receive a clear, itemised quote so you know exactly what’s included before any work begins.
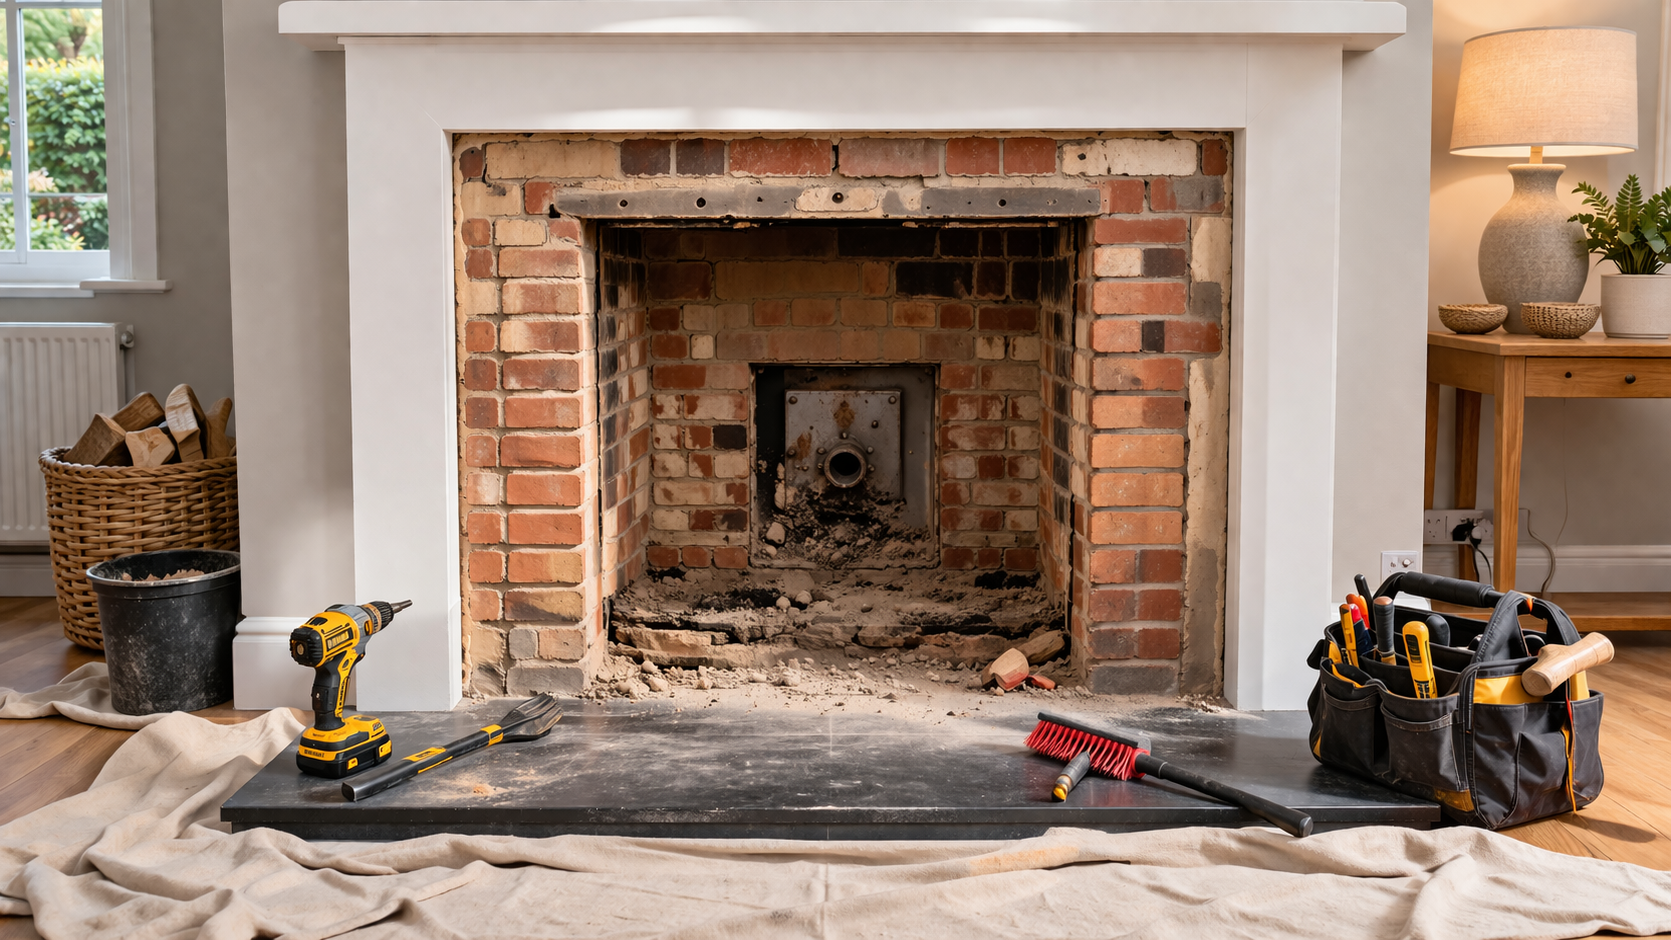
Step 2: Isolating and removing the back boiler
On installation day, the first job is to safely disconnect the existing system. The gas supply is isolated, and the back boiler unit is removed from behind the fireplace.
This also involves removing the old gas fire and its decorative surround. While it might sound disruptive, experienced engineers carry this out carefully to minimise mess and protect your living space.
At this point, your heating and hot water will be temporarily off, but this is planned and kept as short as possible.
Step 3: Decommissioning the flue and making the fireplace safe
Back boilers use a flue that runs up the chimney. Once the boiler is removed, that flue needs to be properly decommissioned and made safe.
You’re then left with a fireplace opening—and a decision to make about what to do with it.
Some homeowners choose to have it capped and plastered for a clean, flat wall. Others install a decorative surround, an electric fire, or even a log burner. The key point is that removing the back boiler gives you options you didn’t have before.
Step 4: Installing the new boiler
With the old system removed, attention turns to the new boiler installation.
Modern boilers are usually installed in the kitchen, utility room, or an airing cupboard. They’re compact, wall-mounted, and far more flexible in terms of placement than old back boilers.
The engineer will connect the new boiler to your existing radiator system and either your hot water cylinder or directly to your mains supply if you’re moving to a combi system.
This is also where new pipework may be run if required, depending on the layout of your home.
Step 5: System flush and optimisation
Older heating systems often contain years of sludge and debris in the pipework. Before the new boiler is fully commissioned, a system flush is carried out.
This removes contaminants that could otherwise damage the new boiler or reduce its efficiency. It’s a critical step in protecting your investment and ensuring the system runs properly from day one.
Step 6: Testing, commissioning and handover
Once everything is installed, the system is tested and commissioned.
This includes checking pressure, ensuring all radiators are heating correctly, and confirming that hot water is delivered consistently. The engineer will also walk you through how to use your new system, including any controls or smart thermostats.
Your boiler is then registered with the manufacturer, and Building Control is notified on your behalf.
How long does back boiler removal take?
Most back boiler replacements are completed within one to two days.
The first day typically focuses on removal and preparation, while the second covers installation and commissioning. In more complex cases—such as additional pipework or fireplace alterations – it may take slightly longer, but this will be clearly outlined in advance.
What disruption should you expect?
This is one of the most common concerns, but in reality, disruption is usually minimal.
You’ll be without heating and hot water during the installation, and there will be some noise while the old system is removed. However, experienced installers take care to protect your home, keep the workspace tidy, and complete the job efficiently.
By the end of the process, your heating and hot water will be fully restored – often with a noticeable improvement in performance.
What does your home look like afterwards?
One of the biggest changes is the space you gain.
With the back boiler and gas fire removed, your fireplace wall is no longer restricted. Whether you choose to create a clean, modern finish or install a new feature, the room often feels larger and more flexible.
Combined with a quieter, more efficient heating system, it’s a noticeable upgrade in both comfort and usability.
Is it worth the disruption?
For most homeowners, the answer is yes.
While there’s some short-term inconvenience, it’s outweighed by long-term benefits: lower energy bills, improved reliability, better hot water, and a heating system that meets modern standards.
If you’re still unsure, it’s worth comparing the long-term savings and performance improvements outlined in our other guides. In most cases, replacing a back boiler isn’t just necessary – it’s a smart upgrade.
Ready to Replace Your Back Boiler?
If you’re considering a back boiler replacement, the best next step is a clear, no-obligation quote.
We’ll assess your current system, recommend the right solution for your home, and provide a fully itemised price with no hidden costs.
Get your free quote today and take the first step towards a more efficient, reliable heating system.